Shooting House Floor Plans
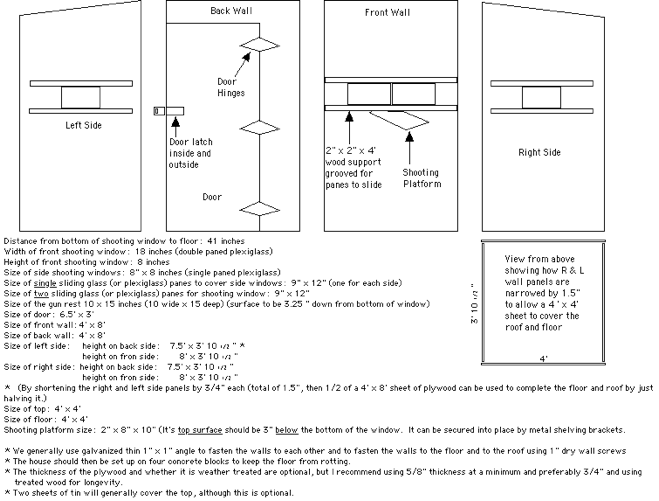
The plans require five sheets of 5/8” to 3/4” thick exterior grade plywood or OSB board. One sheet is utilized for each of four walls. The fifth sheet is cut in half and used for the roof and floor sections. Four 9 x 12 inch sheets of Plexiglass are used for the sliding windows. A couple of 8 feet by 2 x 2 inch wood strips are used to frame support for the windows. Three heavy duty steel hinges are used to swing the door. A steel latch can be used to keep the door closed and locked. Two pieces of six foot roofing tin are used to provide drainage from the roof. A small piece (about 15 inches long) of 2 x 8 inch wood is used to place a shelf underneath the front window to provide a stable shooting platform on which to rest your rifle and sandbags. This will require two 12 inch “L” braces underneath to give it stability. The inside edges of the door should be rimmed with 1/2 inch steel or aluminum channel (three pieces about 8 feet long) to keep the door from warping thus avoiding rats and wasps from entering through the resulting cracks. The house should be set off the ground on four concrete blocks to avoid the floor from deteriorating over many years. Make a note to have the top of the door at least 8 inches from the top of the back side of the house. This avoids the door hitting the downward sloping tin roof when opening the door. Place a piece of 4 x 4 foot carpet on the floor of the house. This will provide a lot of warmth and keep things quite when you get nervous and drop your coffee cup or need to shift your chair’s position for a shot.
I’m still using the first of these houses I built in 1974, so they will likely never need replacing in your lifetime. Just bear in mind that this thing is really heavy duty, with the emphasis on H-E-A-V-Y. It will weigh close to 400 pounds when you finish, so don’t plan on placing it in its location alone. You’ll need at least a couple of buddies to set it up. A tractor with a front end loader is an ideal partner. Once in place, a soft, comfortable swivel chair is ideal.
Tools required include:
- a hammer (but no nails... put it together with drywall screws)
-
an electric drill with 1/16 bit to provide a sink hole for wood screws & 1/2 inch bit to place start holes for the saw
-
screw driver head for the drill (Phillips head style)
-
1 1/2 inch Phillips head drywall screws --> about a hundred should be enough
- wood saw such as an electric skill saw, hand saw, or oscillating saw
